Hootsuite

Hootsuite

Blog classroom management tips

Sunday Sit, Sip, and “Sync” ~ July 12, 2015

Last week we shared “TweetDeck” in our Sunday post and how its use can simplify your management of Twitter.

But, wait.
You say you also use Facebook and Instagram?
What you need is an “SMMS”.

“SMMS”?
A “Social Media Management System”.

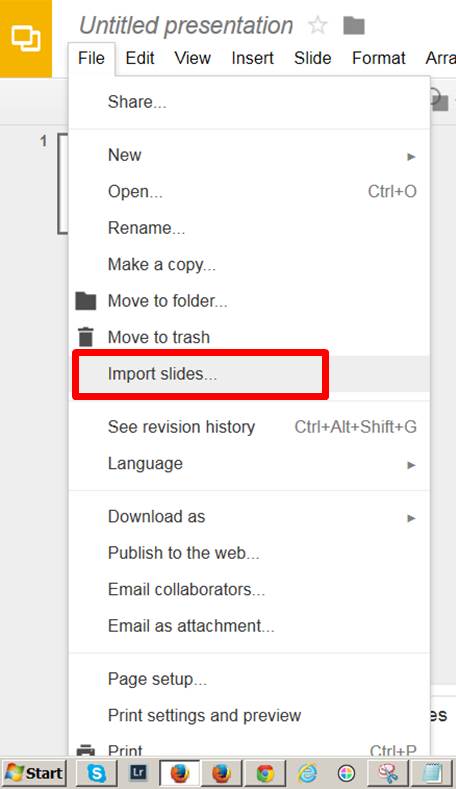
Introducing Hootsuite to take managing your social networks to another level.

With Hootsuite, you have plenty of options if you want to pay.
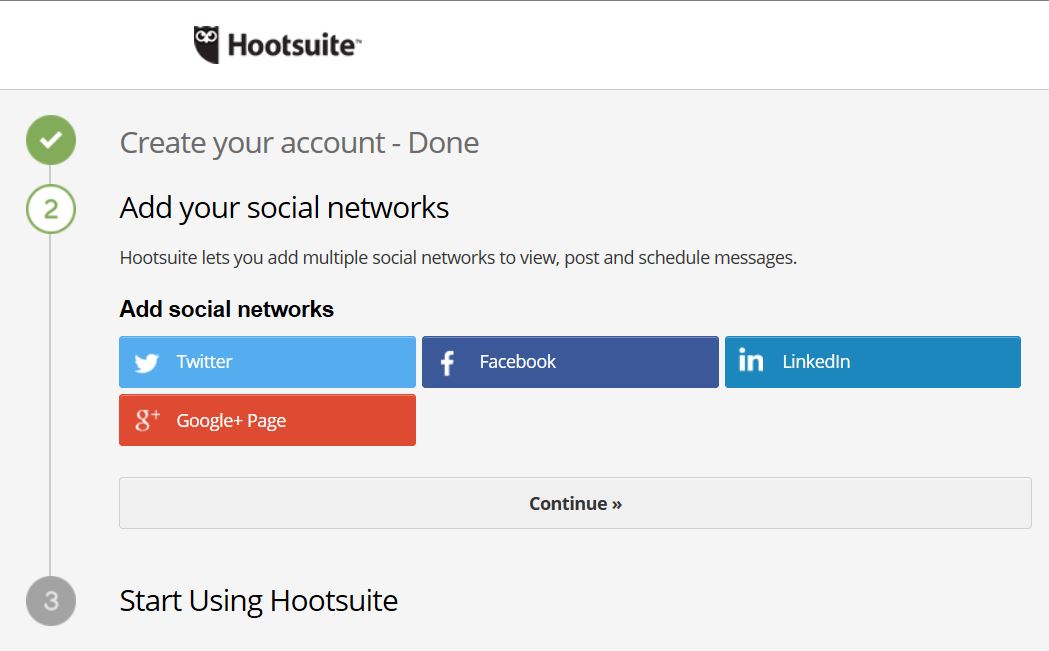
The good news is that with a “free account”, you can manage three of your social networks, and we think that is more than enough to spread the word about your classroom, school, and district.

Hootsuite_5

What is Hootsuite?
According to Wikipedia:

“Hootsuite is a social media management system for brand management created by Ryan Holmes in 2008. The system’s user interface takes the form of a dashboard, and supports social network integrations for Twitter, Facebook, LinkedIn, Google+, Foursquare, MySpace, WordPress, TrendSpottr and Mixi.

Additional integrations are available via Hootsuite’s App Directory, including Instagram, MailChimp, Reddit, Storify, Tumblr, Vimeo and YouTube.”

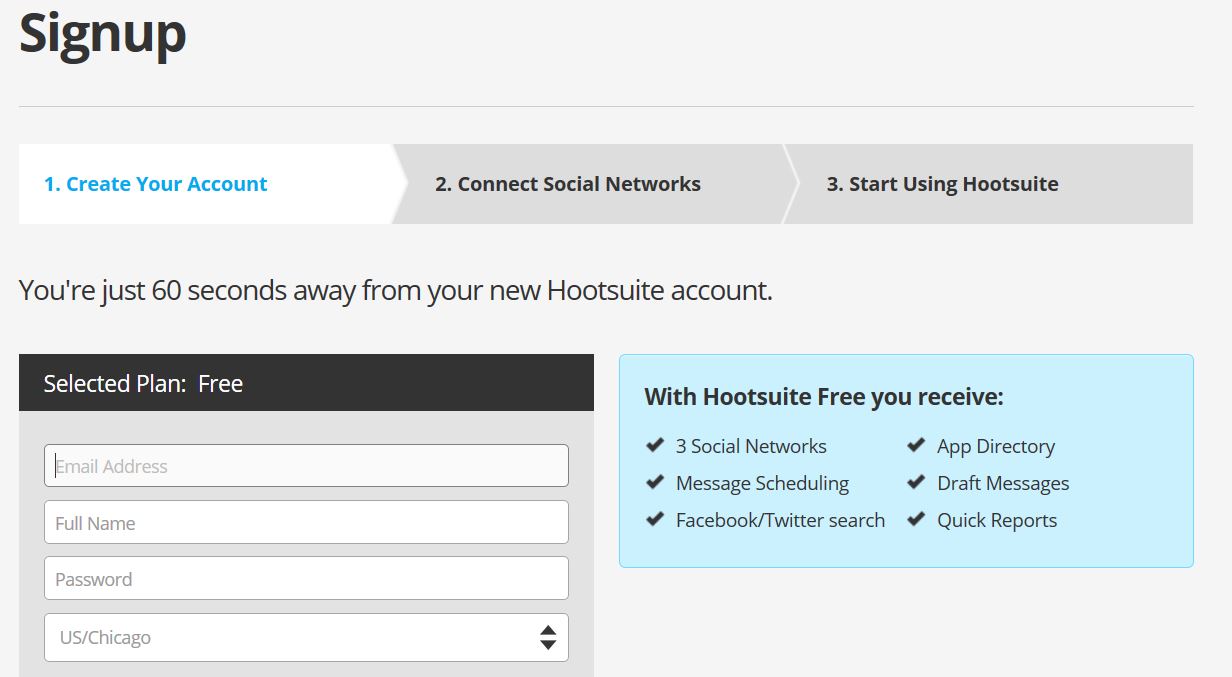
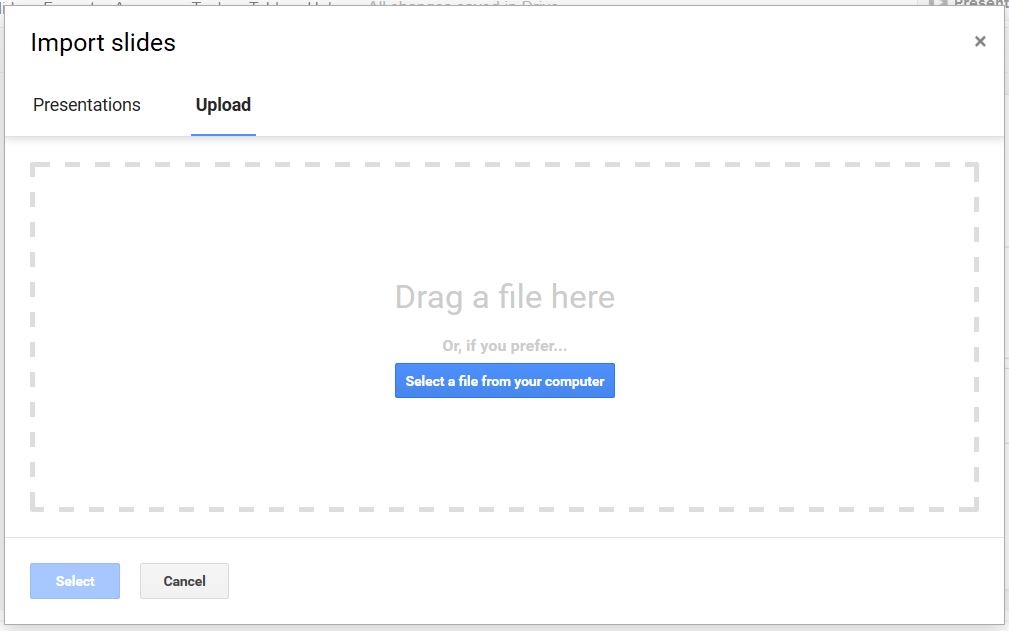
Creating an account is easy with your email or your Facebook account.

HootSuite
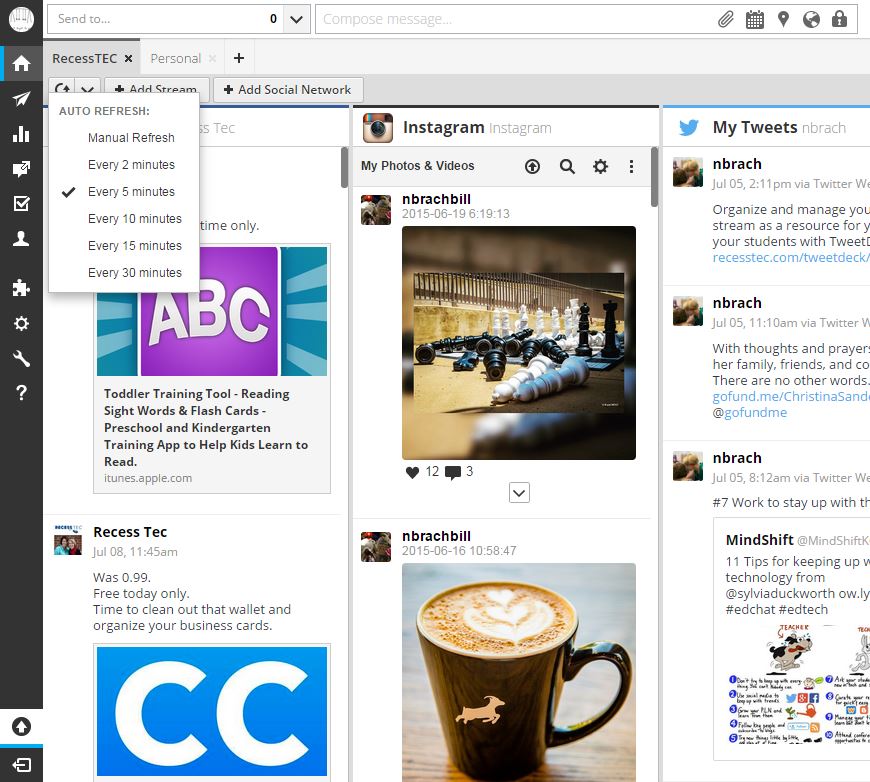
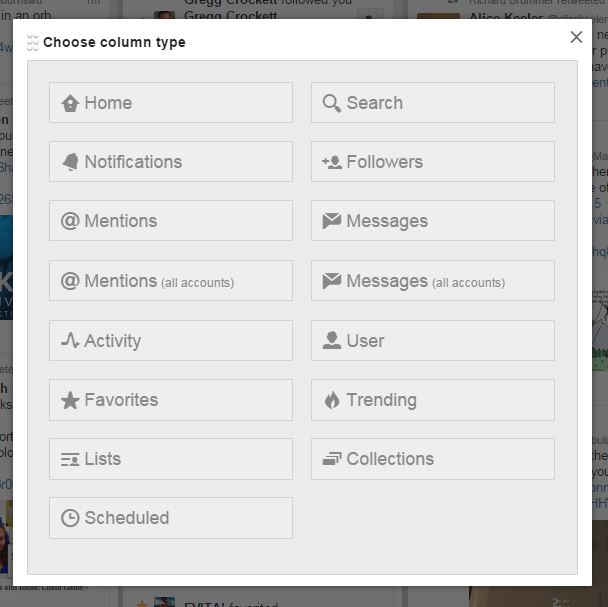
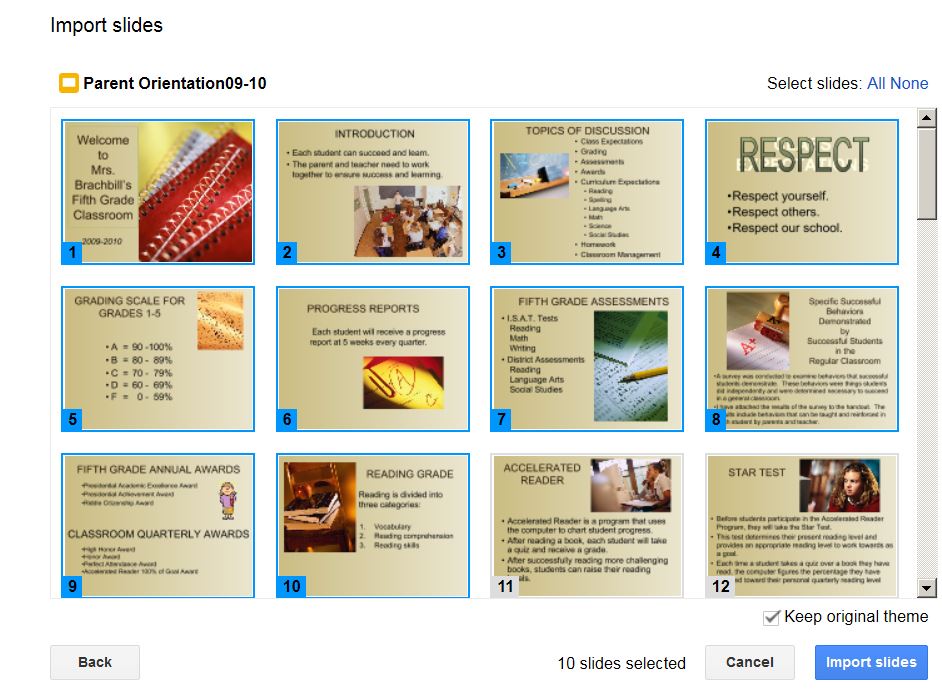
Once you are logged in, you can create columns personalizing them with your tweets, mentions, feed, messages, and timelines.
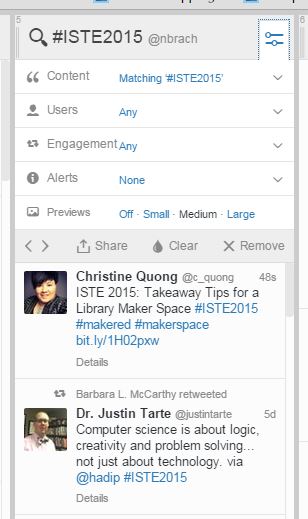
You also have the option of how often you want your social streams to refresh.
It defaults to “Every 5 minutes”, but that can be changed.
Hootsuite_6
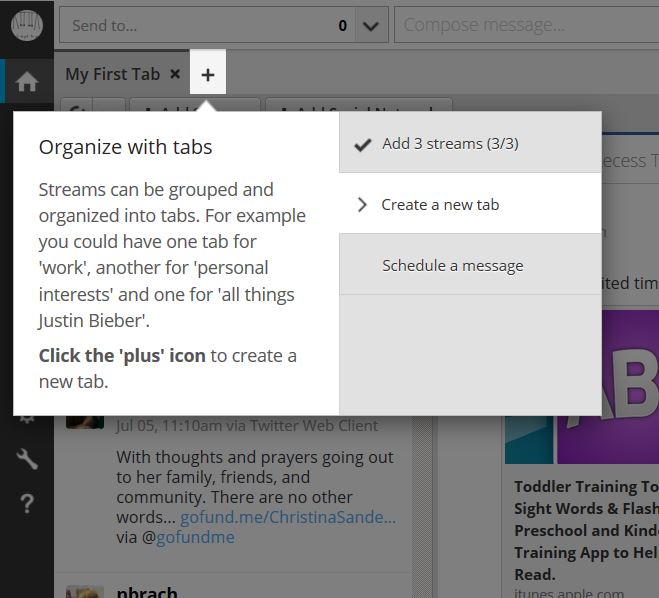
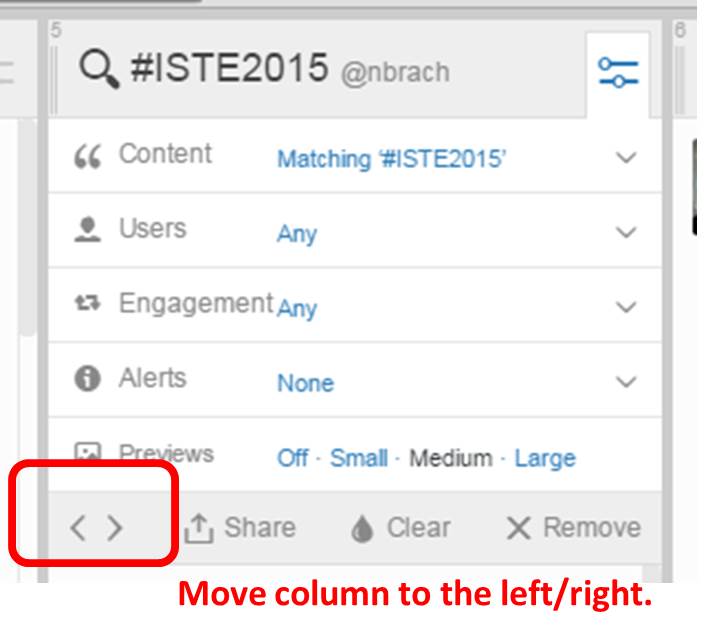
You can also add tabs, and by clicking into the titles, you can personalize them.

HootSuite_2
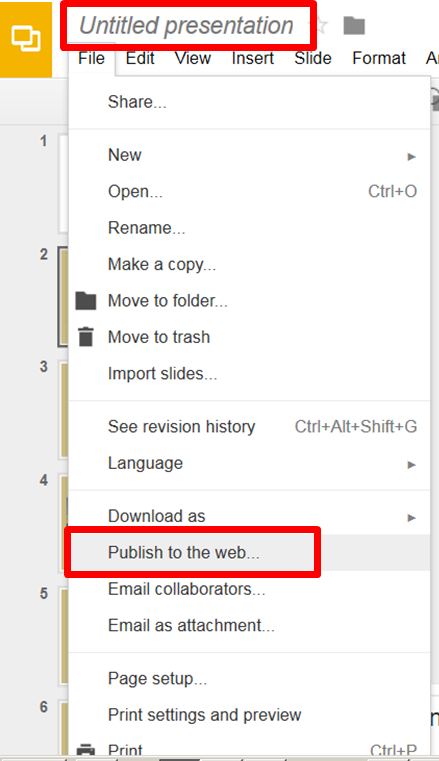
Hootsuite. Helping you keep it simple.

[Tweet “Using Hootsuite to organize and manage your social networks as a resource for yourself and your students.”]

TweetDeck

TweetDeck

classroom management tips

Sunday Sit, Sip, and “Sync” ~ July 5, 2015

Here’s another tip for our friends who are using, or plan to incorporate social media in their classrooms.
We have shared “TweetDeck” in our workshops, and how its use can simplify managing information.

What is TweetDeck?

According to Wikipedia:

TweetDeck is a social media dashboard application for management of Twitter accounts. Like other Twitter applications, it interfaces with the Twitter API to allow users to send and receive tweets and view profiles. It was the most popular Twitter application with a 23% market share as of June 2009, following only the official Twitter website with 45.7% share for posting new status updates. It can be used as a web app, a Chrome app, or a desktop app. TweetDeck’s interface consists of a series of customisable columns, which can be set up to display your Twitter timeline, mentions, direct messages, lists, trends, favorites, search results, hashtags, or all tweets by or to a single user. The client uses Twitter’s own automatic and invisible URL shortening whereby a link of any length will only use 23 characters of a Tweet’s 140-character limit. All columns can be filtered to include or exclude words or tweets from users. Tweets can be sent immediately or scheduled for later delivery. Users can monitor and tweet from multiple accounts simultaneously. For added account security, users signing in with their Twitter username and password can use Twitter’s own two-step verification, known to Twitter users as Login Verification.”

I use the web version of TweetDeck and I quickly access it through its own “tile” on my Symbaloo Home Page.
(More on Symbaloo with a link to a past post.)

With TweetDeck, you can manage your Twitter feed with columns that can be personalized containing live feed of your “Mentions”, “Notifications”, “Favorites”, and specific searches for hashtags, lists, and trending topics.

TweetDeck2

tweetdeck3
You can order the columns and add or delete them to meet your needs.
Ordering your columns is accomplished by simply clicking on the arrows to move them vertically.

tweetdeck4Finally, make sure you go down to the settings in the lower left hand corner to explore all of your options.
There you can see where multiple accounts can be added, as well as multiple users on each TweetDeck account.

tweetdeck5

TweetDeck. Helping you to keep it simple.

[Tweet “Organize and manage your Twitter stream as a resource for yourself and your students with TweetDeck.”]

Embed Google Presentations

Embed Google Presentations

classroom management Google tips

Sunday Sit, Sip, and “Sync” ~ May 31, 2015

Here’s a summer project.
Learn to embed Google presentations to provide quick access for student support and curriculum resources.

Start with your “Parent Orientation” or your “Welcome Back” presentation while the changes you want to make next year are fresh in your mind.

Embed Google Presentations

If you already have a PowerPoint, tweak it and update it with clean, fresh images and concise information.

Embed Google Presentations

Next, log into your Google Drive and browse to find and upload your PowerPoint to your Google Drive.

Embed Google Presentations


Make sure you select the slides you wish to import and check the box if you want to preserve the original formatting and theme.


Embed Google PresentationsNext, name your Presentation, and choose under “File” the “Publish to Web” option.

Embed Google Presentations
After the window opens, click on “Embed”, and select your preferred options for your slideshow. Click on “Publish”,

Embed Google Presentations

and you will get an “Embed Code”.

Embed Google Presentations


Copy the code, proceed to the webpage you have designed for your slideshow, and while in the HTML view of your page, or using an HTML element, paste in the code. Your slideshow is now ready to view online.

The best part of this process is that when you update your Google Presentation, your “live” online presentation will automatically sync your changes. By having this presentation online and available, your parents and students will have access to it if they aren’t able to attend orientation or open house. It’s also a convenient way to offer support for new students and their family members.

[Tweet “Learn to embed Google presentations to provide quick access for student support and curriculum resources.”]

Google Bookmarks

Google Bookmarks

classroom management Google tips

Sunday Sit, Sip, and “Sync” ~ May 24, 2015

Your 2014-2015 Planbook is either on, or near its last page. It’s time to create and organize your “Year-End Check-off List”. In terms of technology, we cannot stress enough one word.

Backup.
Backup.
Backup.

I vividly remember sitting in an administration office working on a school website on the first day of summer break. In the next room, the district IT administrator was moving files and cleaning out network drives. I also remember the reaction when the entire junior high network drive was accidentally deleted. Although I understood the magnitude of what had just happened, I also felt confident that all of my files were safe. The last thing I had done was a full backup.

Once your files are secure, your next task might be to clean out, delete, and organize your bookmarks. If you are logged into Chrome, these can be accessed from any computer. In addition to Chrome bookmarks, Google has its own bookmarking online service that can be accessed from any browser. By adding a “Google Bookmarklet” to your web browser, you can easily bookmark webpages and label them to organize them. Make sure you have enabled your “Bookmarks Bar” to view the bookmarklet where it will be “dragged”.

These bookmarks are private, and currently you are not able to sync them with Chrome bookmarks. We are hoping this will be a feature that will be added as Google continues to expand its features. For now, you can share individual bookmarked links via your “Google+ Share” tab.

GoogleBookmarks5

The main advantage of your Google Bookmarks page is the ability to store your bookmarks and to access them from any browser on any computer.

You will need to go to https://www.google.com/bookmarks/ and log into your Google account. You may discover that you already have some bookmarks. You can sort them by title, date, or label.

GoogleBookmarks2

You can add a bookmark from the toolbar on the side, or you can use the “Google Bookmarklet” to add bookmarks as you clean out and update your Chrome bookmarks.

GoogleBookmarks3

It seems as though there are endless ways to manage bookmarks, but we are doing our best to keep it simple for you.

Recess TEC extends our best wishes for this Memorial Day weekend as you spend the time with your family and friends and pause to pay tribute to those who died serving in the military.

[Tweet “Let Recess TEC show you how to compile and organize your bookmarks so that you can access them from any computer and any web browser.”]

Substitute Feedback Form

Substitute Feedback Form

classroom management tips

Sunday Sit, Sip, and “Sync” ~ April 19, 2015

As teachers, we all know the huge amount of time it takes to get ready for a substitute teacher. I had my “3-ring substitute teacher notebook” and my “required” sub-folder next to my desk “just in case”. I seldom had to use them. Preparing for a “sub” required far more work than it took to be there. Unless I had a family emergency, or I seriously couldn’t physically teach, I was there. Personal days were used for Recess TEC workshops.

And then there was the “Feedback Form” that was waiting for me on my desk when I returned.

As a substitute teacher, I appreciate the time that is dedicated to getting ready for me. I try to follow the plans as much as I can and to leave comments about my day. There is often a paper feedback form to fill out with a pen/pencil, but more often, when there is none, I open up a Word document and type observations, feedback, comments and messages as the day moves forward.

As I sat Friday afternoon filling out a “Sub Feedback Form”, I thought about Google Forms. As a substitute teacher, it would be much easier to fill out an online form designed for that purpose. As a teacher, it would be nice to have all of the feedback collected in one spreadsheet that I could access from home where I could plan to address any issues when I returned. (That’s what you want, right? To get good news about how your students did exactly what they should have been doing!) It couldn’t replace the plans and general instructions for the substitute, but it would be a nice alternative to the usual feedback form.

If you choose this type of feedback form, I would make sure of the following:
1.    The option for a “digital feedback form” is at the top of the list of instructions for the substitute teacher so he/she could begin using it from the beginning of the day in each class.
2.    The link to the form is clearly labeled and visible on your computer desktop in a folder marked “Substitute Teacher”.
3.    Make sure the substitute teacher has access to your computer desktop.

I’ve put together an example to use as a start for your own. I tried to make it appropriate for both departmentalized and self-contained classrooms. You can view below or here.

If you have any ideas/comments/suggestions as to ways this form could work better in your classroom, please share in the comments. We’re all in this together!

[Tweet “Get the “good news at home with a “digital” option for substitute teacher feedback forms using Google.”]

Quicker QR Codes

Quicker QR Codes

classroom management tips

Sunday Sit, Sip, and “Sync” ~ March 22, 2015

We are finding more and more of our teachers are adopting the use of QR codes to direct their students to resources and activities. If you are using Mozilla Firefox as your browser, there is a little add-on that can speed up generating your QR codes. By enabling the add-on, “QR Code Image Generator” by webdevmedia, you only have to right-click and scroll down to find your generator. This add-on will allow you to make QR codes of the current URL, selected text, or “free text”.

Quicker QR Codes
It also works offline.
If you prefer shortcut keys, just press CTRL-SHIFT-Q. 

Quiicker QR CodesQuiicker QR Codes

You no longer have to search for QR code generators or go to your bookmarks.

I took a substituting job last week, and the teacher had developed an activity for a math center. After students completed a worksheet on fractions, they used their iPods to check their answers using the QR codes next to each problem. Who doesn’t love to see the “fist pumps” and to hear whispered, “Yeses!” when our students scan the codes that lead them to a correct answer?
Just another way technology can motivate students to learn.

NOTE:
Oh, and I looked up the spelling of the plural form of “yes” and learned from several sites that either “yeses” or “yesses” are acceptable.
And the plural form of “no”? That would be”noes”.

Have a great week!

[Tweet “With this Mozilla Firefox add-on, generate QR codes quickly within your browser and while working offline.”]

Common Comments

Common Comments

classroom management Google tips writing

Sunday Sit, Sip, and “Sync” ~ 2-22-2015

Every day our curriculum and collaborative work are moving to an online venue, and we are encouraging our students to create and submit their work in digital form. Here is a tip we picked up at METC 2015 in the session, “Become a Google Ninja” presented by Michael McCann and Greg Lawrence . This was a new one to us, and we couldn’t wait to share it with you. Continue reading to find out how you can quickly add one of those common comments we all use when assessing student work.

We’ve seen and used the “canned comments” our grading programs provide, but most of us like to add our own comments that reflect our personal “voice”. Google Docs provides that option under “preferences”.

Common Comments 1

Just access that option under “Tools” where you can find the shortcuts that are there for you, and delete and add to personalize it even more.

Common Comments 2
Make sure you choose characters and combinations that you wouldn’t normally use, such as “qa”.

Stay warm, enjoy your Sunday, and hopefully the sun is shining in your corner of the world!

[Tweet “A tip from an #METC15 session: Google Docs allows us to personalize shortcut “keystrokes” to add “common comments” and symbols to our work.”]

TeacherTipster.com

TeacherTipster.com

classroom management tips

Sunday Sit, Sip, and “Sync” ~ 11-2-2014

This is a tip about tips.
A lot of tips.

“Hey, guys. Mr. Smith here…”

Dustin Smith is a first grade teacher at Woodrow Cummins Elementary School in Conway, Arkansas with over ten years of teaching experience.
He comes from a family of teachers,
but started out working towards a degree in telecommunications.
Teaching wasn’t the original plan.
We know how that goes.

But what we don’t know is how “Mr. Smith” has escaped us all these years,
We promise there is something here for everyone.
We are the latest fans of his YouTube channel, TeacherTipster.comTeacherTipster.com

We know.
He teaches First Grade.
And you might be thinking, “How is this going to help me, the high school calculus teacher?”

Again, we promise you, there is something here for everyone.
You will find tips that will add, not only fun, but some practical and motivating management tools to your classroom.
Don’t skip the comments.
His fans often share their own ideas and tips.
One of  the best comments on one such video was, “Are you married?”
Yes, he is married to Miss Suzy, as you will learn in “Fruit for You”.

And the “technology” part?
Mr. Smith’s TeacherTipster.com videos are great examples of what you can do to enhance your curriculum, share your lessons, and hopefully motivate you and your students to produce your own instructional videos.

He has a website with even more tips,
and if you scroll down to the bottom of his home page, you’ll see that he has developed several apps.
There is a Teacher Tipster Pinterest Page,
and you can follow TeacherTipster.com and Mr. Smith on Twitter,

If nothing else, just watch Mr. Smith’s videos for pure entertainment.
His love of kids and teaching is contagious.
And it doesn’t hurt to catch some of that love before you head back to your classroom on Monday morning.
He is a teacher few kids could ever forget…

[Tweet “We are the latest fans of the YouTube channel, TeacherTipster.com.”]


William Tell

William Tell

classroom management tips

Sunday Sit, Sip, and “Sync” ~ 9-14-2014

When my kids were little,
I was their “Countdown Timer”.
When it was time to pick up toys, we would work together in a race while I “sang” (sort of) the William Tell Overture. Several times a day, this worked for years.
It wasn’t necessarily something I could use with my students.
(Although I won’t deny resorting to that every now and then.)

Now we have “digital tools”.
If you need a quick online “Countdown Timer”, try this one.
You can simply highlight the time and type in your personal preference.
On the lower right side is the option to toggle it to “full-screen”.
The best feature is found with the “gear” on the lower left side.
Click on that, and you will find an embed code.
You simply “copy and paste” it to permanently add this timer to one of your classroom website pages.
We have embedded an example below.

Another fun feature is the option to add an assortment of music as your timer counts down.
Try it when your class has five minutes to line up for recess, or seven minutes to unpack their book-bags and turn in their homework.

Free.
(Excuse the “ads”, but, again, “Free.)

And if you would just rather play Rossini’s William Tell Overture,
we can oblige you with that, too.

Have a great Sunday!
Get outside!
Have a great week!
And even if the weather isn’t perfect,
we hope you find the time to “visit fresh air” with your students, too.

Time’s Up!

Time’s Up!

classroom management tips

Sunday Sit, Sip, and “Sync” ~ 9-7-2014

If you are like me, I never have enough time with my students in the computer lab.
It seems that when I look up at the clock, it is time to stop.
As in NOW.
Here are a few tips to add minutes to production time.
You can work longer AND still leave the lab ready for the next class.

Teach your students these basic keyboard shortcuts:

1.    CTRL + S = Save
Have your students do this when they first begin their project, and it will default to a “Save As…”.
At the end of the class, this keystroke will quickly do a “final save”.

2.    ALT + Spacebar (together) and then “C”.
This will close all open windows.

3.    Windows Key + L = Lock Screen
This is the final keystroke so students can log off and their computer is ready for the next student.

Windows-D4.    Windows Key + D = Minimize all windows showing desktop.
I use this when I want to speak to all students without their working windows open.
They know what “Windows-D” means.

We hope this give you a few extra minutes at the end of your “lab time” and saves you a few extra steps with your personal computer use.

Have a great Sunday.
It looks like “early heat dismissals” are finally coming to an end.
Make the most of that extra time with your students!